Saturday, August 20, 2011
Two Paisley Dresses Completed
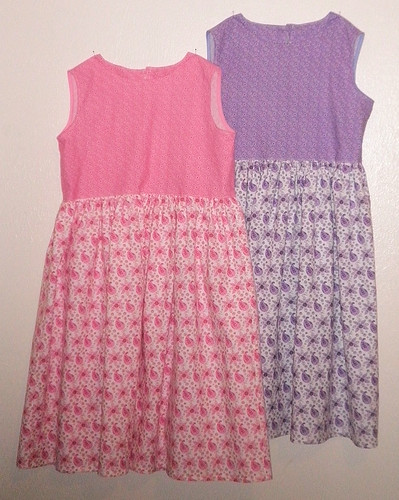
Just completed two more dresses for Anya and Gabriella using Simplicity 2688. Am now going to try to get a few hours sleep before I need to get to JoAnn's to get some more patterns. They're having a sale on Simplicity patterns, 5 for $5, limit 10, and I was able to get 10 I wanted yesterday but still have a few others I'd like to get so I have more variety to make for the girls.

Saturday, August 13, 2011
Another cute little dress done
Love the circles on this one! This is the Kwik Sew #3907 again, size 18-24 months. I didn't have enough of one color of buttons so I alternated between pink and green for the back closure. Matches the dress so I think it worked out.

Wanted to get this one done so I can concentrate on the outfits for Marci since the patterns came in yesterday.
Wanted to get this one done so I can concentrate on the outfits for Marci since the patterns came in yesterday.
Friday, August 12, 2011
And another dress finished
After cutting out the last dress pattern, with Truffles' help, I sewed the bodice and skirt up and attached the skirt to the bodice then had to go to bed as I needed to get to work early the next day. I needed to leave early for a dentist appointment so didn't want to miss too much work as a result.
After the dentist appointment, where I had two teeth extracted, I tried to sew a bit but the pain meds made me dizzy so I took a short nap. After getting up, I finished the dress by sewing the bodice and bodice lining together, top stitching the bodices, and adding the double ruffle.

Pattern used: McCall's M5835
And here it is, the dress for my little cousin Kasia:

Pattern used: McCall's M5835
I accidentally bought two copies of this pattern (sizes 1, 2, 3, 4), so if anyone (U.S. only) would like it, let me know. Listed price is $11.95 but I got it on sale for $2.99, so I'm willing to let it go for $4.00 (the extra is for shipping).
The patterns I'd ordered for Marcie came in this morning so this weekend will be spent cutting out the pieces and starting to sew them together. Not sure yet if I'll cut out all of them first then sewing them all at once, or cut them out one at a time and sewing together before moving on to the next one. I don't want to make a decision right now until the pain meds wear off a bit though ... :P
Thursday, August 11, 2011
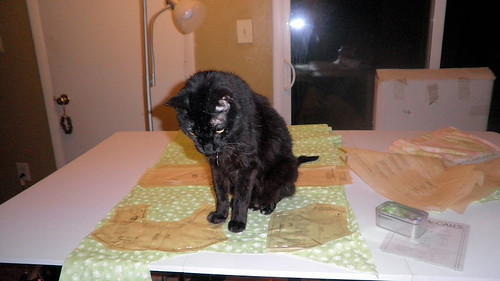
How my cat helps me sew
This evening I was cutting out another little dress and, as usual, my cat Truffles decided to help. When he wasn't sitting on the fabric or pattern pieces, he was helping me place pins by nudging my hand to the correct location. Truffles is 19 in people years and the gray hairs have started to show up among the dark chocolate. Truffles has dark chocolate fur with a milk chocolate under coat, which is how he got his name. I've had him since he was four when a co-worker at Boeing needed to find a home for him after he got married and his wife was allergic to cats. Even though I'm also allergic to cats (and dogs), I really needed a cat at the time and agreed to adopt him. Fortunately, God found me the perfect cat as I don't seem to have any problems around him. Get me around just about any other cat and most dogs, and my hands and eyes start itching and swelling, the nose starts running ...
Here is Truffles helping me figure out where to place the pattern pieces:

And here he is taking a short break while trying to figure out why Mr. Darcy was moving around in his bed:

And finally, here he is holding down the fabric so it doesn't slide off the table:

Fortunately, Truffles doesn't mess with my yarns, unlike Mr. Darcy who has been known to chew through projects and yarn balls, especially if they have wool or alpaca in them, and hopelessly tangle recalcitrant skeins.
Wednesday, August 10, 2011
My Junior/Senior Banquet, 1982
I thought I would post this photo from my Junior/Senior Banquet in high school during my Junior year. I went to our church school so no prom. This was in 1982 and I was obsessed with Princess Diana. I decided I wanted to make a "copy" of her wedding dress and found a pattern that was sold as "inspired by" or something. Anyway, the dress is made of white dotted swiss with the lining made from a white cotton sheet (cheaper than buying the fabric). We rented a hoop from a local costume shop and my Aunt Mary did my hair and makeup.
I still have the dress hanging in my closet although I'll never be able to get into it again!

I still have the dress hanging in my closet although I'll never be able to get into it again!

If you can't sleep ... sew
I've been having a lot of trouble sleeping lately so I've been spending my time sewing and finally got several dresses finished, buttonholes and buttons added, etc.
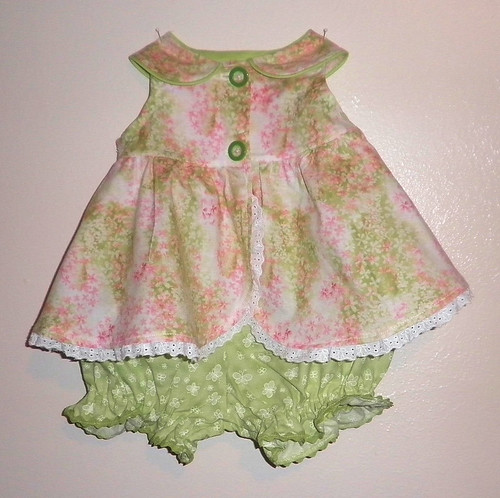
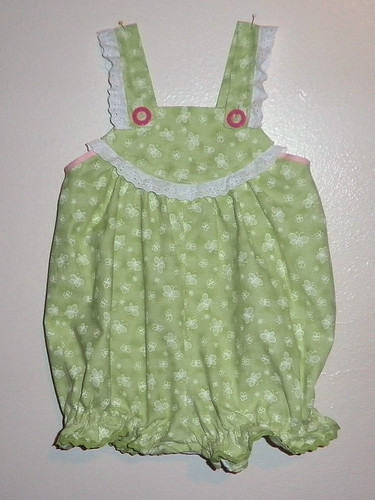
First up are the outfits I started last year for a cousin, Isabella. I finally got the buttonholes done and buttons added. My new sewing machine actually makes buttonholes that don't chew up the fabric!

And the romper which can be worn alone or under the matching dress above:

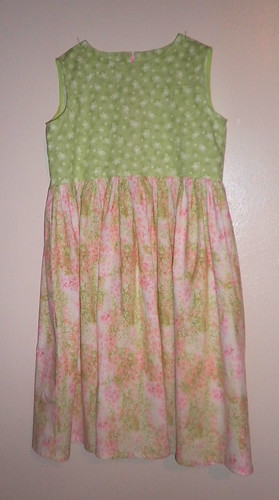
Next are the dresses for Anya and Gabriella, although I'm only showing one of them. Since they are the same size, I put zippers in that are their favorite colors so they can tell them apart.

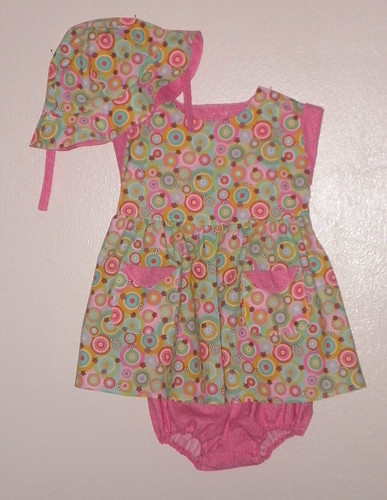
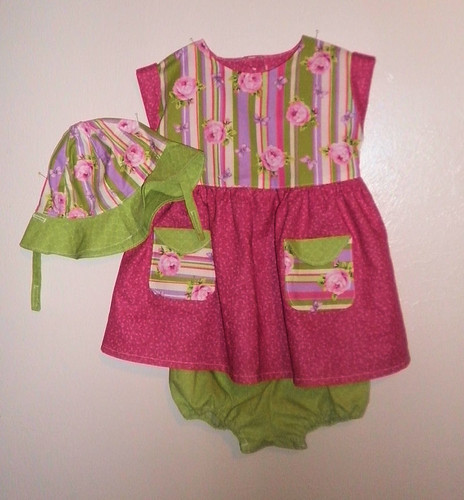
Finally is this adorable outfit that should fit either Isabella or Kasia. I originally bought the fabric as fat squares to make project bags for but decided to see if I could get a dress out of them. I tried to get more of the rose and green fabric but the store only had one rose one left and no green so I got the pink instead. Since the fat squares aren't that big, I added a 1/4" seam allowance on the front skirt where the fold should have been and just seamed it up. The hat is reversible and I made the inside all green. There are buttonholes on the sides so that the straps can be pushed through to use when the hat is reversed.

Patterns Used:
First up are the outfits I started last year for a cousin, Isabella. I finally got the buttonholes done and buttons added. My new sewing machine actually makes buttonholes that don't chew up the fabric!
This is the little dress with bloomers:
And the romper which can be worn alone or under the matching dress above:
Next are the dresses for Anya and Gabriella, although I'm only showing one of them. Since they are the same size, I put zippers in that are their favorite colors so they can tell them apart.
Finally is this adorable outfit that should fit either Isabella or Kasia. I originally bought the fabric as fat squares to make project bags for but decided to see if I could get a dress out of them. I tried to get more of the rose and green fabric but the store only had one rose one left and no green so I got the pink instead. Since the fat squares aren't that big, I added a 1/4" seam allowance on the front skirt where the fold should have been and just seamed it up. The hat is reversible and I made the inside all green. There are buttonholes on the sides so that the straps can be pushed through to use when the hat is reversed.
Patterns Used:
- Toddler Dress and Romper - New Look 6794
- Girl's Dress - Simplicity 2688
- Precious Peony Dress - Kwik Sew 3907
One thing I found on the Kwik Sew outfit, the bodice back indicates that you should cut out 2 of the fabric and interfacing. It should have you cut out 2 of the fabric, contrast, and interfacing.
I've got some more fabric that's just waiting to be cut out ...
Tuesday, August 09, 2011
Sewing Tip #1 - Using all pattern sizes
While I like being able to get multiple sizes in one pattern purchase, it is not always easy to actually use all the sizes you get. Since I have large family with lots of first, second, and third cousins (may be some fourth cousins in there too), I need all the sizes. I also prefer to use paper patterns over tissue ones since they last longer - for me anyway.
My solution is to trace the different sizes on to sew-in interfacing or butcher paper. The interfacing can be purchased in yards off the bolt and in a fairly thick version. Make sure you get enough to trace off all sizes of all pattern pieces. Some places, like Clotilde's, have pattern tracing cloth you can purchase but they tend to cost more. You can also use craft or butcher paper but you will also need tracing paper and a non-serrated tracing wheel since you can't see through the paper.
Supplies:
- Medium weight sew-in interfacing, or
- Craft or butcher paper with the following:
- Tracing paper
- Non-serrated tracing wheel or embossing stylus with 1.5 mm tip
- Scissors (don't use your good fabric scissors!)
- Straight pins
- Ink pen (Bic or Pilot pens work great) or permanent fabric marker
- Straight edge (ruler) if needed
- Gallon sized plastic zip-lock bags (for pattern storage)
Steps:
If using sew-in interfacing or tracing cloth:
- Cut out the patterns from the sheet they came on. You don't have to cut them out on the lines, just close enough to get them as individual pieces.
- If using the sew in interfacing or pattern tracing cloth, lay it out on your work table. Make sure it is supported on any end that hangs off the edge of the table, either by placing it on a chair or folding it up on to the table and placing a book on it (or a cat if one is convenient and willing).
- Place your first pattern piece under the cloth and pin the cloth and pattern together. Don't pin it as much as you would when actually cutting out the fabric. Pins at each "corner" and one or two along longer edges should be sufficient.
- Begin tracing the first size. If you want to save the original patterns, start with the largest size, otherwise, start with the next size in.
- Trace the outer lines first, including any notches.
- Move the cat as needed.
- Trace all other lines, including grain arrow, shorten or lengthen line, center back, fold lines, etc.
- By this time, you may need to move the cat again. If needed, place a pillow where you want him to stay but that's no guarantee he'll stay there.
- Mark text for pattern company, pattern number, piece number, number to cut, etc. Add size somewhere where it is easily visible, i.e., Size S, Size 12, etc.
- Mark text for locations, i.e., Center Front, Back Seam, Neckline, etc. (optional but might as well). Don't move or look away or the cat will move on top of the piece you are working on. He may also call in the dog (or dogs as the case may be) for reinforcement.
- Check over the pattern to make sure you got everything. Remove pins.
- Move pattern piece over to a blank area, pin in place, and repeat until all sizes have been traced for the piece.
- Shut the cat into the master bedroom with a treat and a toy or two. Ignore his complaints. Be strong.
- Continue with each pattern piece until all are completed.
- Cut all pieces out. Again, you don't have to be perfect since they'll be cut that way once you use them to make a garment.
- Pin all sizes of each pattern piece together and place all pieces, along with the instructions and pattern envelope into the plastic bag for storage. Make sure the front of the pattern envelope is on the outside so you can see what pattern it is.
- Lay out the paper on your work table, supporting it as needed.
- Lay the first pattern piece on the paper with tracing paper under it. Pin as needed.
- Use the non-serrated tracing wheel or embossing stylus to trace over all lines.
- Remove tracing paper and pattern piece.
- Trace over all lines with a pen, add in text as noted above (steps 5-11).
- Repeat until all sizes and pieces have been traced, cut out, and stored (steps 12-16).
Not all pieces will need to be traced. If the size lines are straight, the pattern piece is easily folded over while cutting out the fabric for the size you need. Of course, you can still trace off each size if that's what you prefer. Large pieces, such as for skirts can often just be folded back, or the entire piece traced off with all sizes on one piece, then cut lines intermittently on any curved edges so you can easily fold them back to the size you need. This saves the original piece for later use or re-tracing as needed.
While this seems to be a lot of work, it is well worth it and will save you time and frustration later when you realize you need a size that you cut out when making a different size.
If you have any sewing questions or have an idea for a tip, please feel free to mention them in the comments.
P.S. Using an embossing stylus is a good excuse for getting a stencil and some note cards and making some sweet embossed cards.
P.P.S. Can you tell I have a cat?
Saturday, August 06, 2011
Sewing for Family
My cousin Marci has asked me to make some costumes for some of her models to wear. The pattern she picked out is from pioneer days with a dress, chemise, and pantaloons. I'll be making three sizes and with the different pieces, she can get several different outfits from them. I'll also be replacing buttons and elastic with ribbons that she can change out for different colors and fit models that may be almost too big for one size but way too small for the next size.
Marci is an amazing artist and has won multiple awards and mentions for her work. Take a look at her stuff at her site - Marci Oleszkiewicz (betcha can't spell that last name with your eyes closed!). I love looking at her paintings and figuring out which family member she painted! I live so far away from all my family that it delights me to see them this way.
I spent this morning at JoAnn and Hancock Fabrics getting cream and white broadcloth for the outfits. With coupons and my VIP discount from Artfire, I saved about $20 from what I'd thought it would cost. Plus, I was able to get the patterns directly from McCalls for $3.99 as part of their BMV Club, plus $4 shipping for the two pattern packets. The pattern retails for $15.95 and even with Hancock's daily discount of 40%, I saved $8 even with shipping added in.
I also need to finish an outfit for my cousin Tony's little girls (just needs buttons), and cut out and sew two outfits, one for cousin Sarah's little girl and one for cousin Tony's older girl. Next, I hope to get two outfits for cousin Katie's two little girls. I've been trying to get them done for a while and finally decided that it was now or never.
Okay, off to pull the first load of fabric from the washing machine and into the dryer and start the second load .. then ironing will ensue ... :P
Subscribe to:
Posts (Atom)