Saturday, January 16, 2016

Tangling Bruges Lace


I thought I'd do quick "tutorial" on how I drew the Bruges lace on my "Oceans Depth" drawing and hopefully it will help others do the same. Remember that any lace will work, just pick out elements you like and transcribe them to your drawing/tangle.

Don't try to put every element of the lace into your drawing unless you're going for super intricate and want to spend hours upon hours of drawing everything in!

I'm linking to the lace photo I used as my inspiration since I don't want to breach anyone's copyright:

Vintage Lace Making - Lace: Its Origin and History - do a search on "Maline" and it is the second image under that - or click here to load image only.

I decided to use the circle just left of the center as my "starting point." Note the curls of tape coming off the circle, how they start and stop or turn into buds. There are small circles dispersed throughout and the pieces are connected with a netting that has picots on it.

Click on images for a larger version of each.

Step 1: Since I was filling in the top of my drawing, I drew just what was needed to fill in that space, adding details where I needed them or removing them where there was too much. The wavy line at the bottom designates the middle part of the drawing that I'm "adding" to.

Pencil sketch


Step 2: Next, I took my 02 Sakura Pigma Micron pen and outlined the tape. Note how I adjusted the lines as I went along. I also added the circles where the picot netting will connect the different pieces.

Tape drawn in and circles added

Step 3: This step was kinda fun as I drew in the connecting lines between the circles and the curls. For this, I used my 01 Micron pen so it would be a fine netting. Oh, I erased my pencil lines before starting the connecting lines. While I was at it, I went back to the 02 Micron and added the netting inside the center circle and buds.

Connecting threads added and center netting

Step 4: The final step (other than shading) is drawing in the picots. These can be placed anywhere on the connecting lines but they need to alternate on the line, i.e., one on top, next on bottom, next on top, etc. With the 01 Micron (which was used to draw in the lines) and add small teardrop shapes for the picots. Don't be afraid to add more connecting lines if you think an area needs it.
Closeup of picots

Finished Lace

Now, add your color and/or shading!

Try other lace types as well. Once you get the hang of choosing which elements to include and which to leave out, you'll be able to do the same with more detailed lace patterns, like those that include people, animals, flowers, etc.

Check out my post from yesterday to see the original image I posted with the Bruges lace.

Hope you find this little tutorial useful!


More Encyclopedia Tangles and Adding Lace to Tangles

I've continued to tangle on the encyclopedia pages and have been having a blast with the Tuesday Tangles in the Facebook Zentangle: Tangled & Journaled, Too! group. For each tangle I've done, I put the name of the pattern on the page and the date from the challenge, even if I didn't do the tangle on that day.


Last night, I started a new drawing with a large gemstone in the center. I found a photo online of a crystal that had yellow at the base, then blue, then green and used that as the basis for my gemstone. Under the gemstone, I put some knife inspired shapes that fanned out and decided to soften it with some Bruges Lace at the top.

To add your own lace to your tangles, do an image search on lace and look for designs that catch your eye. Pick out parts of the lace that catch your attention and add them to your drawing. I always sketch them in first with a pencil before inking over them.

Before Shading

Oceans Depth

Materials: Sakura Pigma Micron Pens, Prismacolor Colored Pencils on Bristol Paper
Time Spent: 4 hours
Size: 5.75"x9"

That's it for now. Off to find some more lace photos!

Monday, January 04, 2016

Floop - Gemstone Tangle

So, I went to Hobby Lobby after work and picked up a white Gelly pen in order to use it to draw highlights on gemstones. I think that a pen with a larger nib is needed though.


Floop

Materials: Sakura Pigma Micron Pens, Prismacolor Colored Pencils, Gelly Roll Pen on Bristol paper
Time Spent: 2 hours
Size: 5"x5.75"

As I tend to do, I also went searching for gemstone painting tutorials on DeviantArt. Some of the ones I found are for paint programs but the concepts can also be used with paints and colored pencils.

I've created several collections which I'll add to as I find new tutorials and references on DeviantArt:

Gemstone Tutorials
Gemstone References
Misc Tutorials

For a listing of specific gem tutorials for tangling, please join the Tangled Gems- Zentangle® Inspired Jewels and Stones group on Facebook.

Friday, January 01, 2016

Happy New Year 2016!

So, life has been busy lately. I recently closed on a house and although I've been in the house for a month, there is still tons of unpacking to do!

I'm also working hard on patterns for another issue of Crochet Uncut but with everything else happening around me, including working full time, I'm not sure when I'll be able to complete them and publish the issue. But I'll keep at it! I'll try to add another post in a few days with some of the pieces I'm working on.

I've also continued to tangle and recently completed two new pieces.

The first one I completed on 12/21/15 and gave it to my friend Caye as a Christmas present. This last summer, I introduced Caye to tangling and got her addicted to it. She even purchased a Microsoft Surface Pro 3 so that she could tangle in Painter. When I showed her the photo of the piece and asked her if she liked it, she said that she hated it because she'd never be as good as I was. "So," I asked, "I guess you wouldn't want it as a Christmas present then?" Yeah, she changed her tone real quick after that!


A View Into My World

Materials: Sakura Pigma Micron Pens, Prismacolor Colored Pencils on Bristol paper
Time Spent: 14 hours
Size: 8"x10"

Before I show the second piece, I guess a little background information would help. I'm a member of a Journal Tangling group on Facebook but never posted anything there as I usually only do single pages. I'd seen some tangles done on dictionary pages and music sheets so had been looking in various thrift and used bookstores for something I could use. Yesterday, I posted a request on my neighborhood's Facebook page for books, like dictionaries, encyclopedias, hymnals, novels, whatever, and one of my neighbors responded and about a half hour later, her sons showed up at my door with two boxes of books. Inside the boxes were 16 volumes of the 1979 edition of the Britannica Junior Encyclopedia.


I posted the photo above to the Facebook Tangled Journal group and was happy to see other members get excited about doing something similar.

Anyway, I picked out Volume 1, Ready Reference Index, turned to the title page, and started drawing. I finished it on 12/31/15, began coloring it today, 1/1/16, and finished it a short time ago. As I was drawing, I was thinking about whether I should do all pages in the books and leave them there or tear some out and sell or give them away (I'm part of an Art Abandonment group on Facebook). I finally decided that I'll probably do some of each. Then, an idea came to me to use one of them as a guest book! Since I'm in a new home, I could ask each visitor to do a doodle or drawing on a page, then sign and date the page. I can then leave it as is or add some of my own doodles to each page.

Anyway, here's the completed journal page in the encyclopedia:


Volume 1: Title Page

Materials: Sakura Pigma Micron Pens, Prismacolor Colored Pencils on Title Page of Britannica Junior Encyclopedia, Volume 1, 1979 Edition
Time Spent: 12 hours
Size: 7.25"x9.25"

Okay, that's all for now. I really need to go pick a box out of the garage and unpack it ... and my trampoline is looking at me with great disappointment ...

Tuesday, May 19, 2015

Tangle Pattern: 2XV Variation

Once again I've been neglecting this blog although I do periodically "think" about it.

I recently purchased a Microsoft Surface Pro 3 and have been having a blast using it to practice tangle/doodle patterns with. I've also started a digital pattern library at one of my sites - Fignations of Imaginment. I currently have links to almost 3400 patterns in an Excel spreadsheet so I figure it will take me a while to finish the library.

This evening, I was drawing out the 2XV pattern by TexasDoxieMama and came up with a variation of it that I thought was kind of neat. It's flatter than the 2XV one and has a cool undulating feel to it.


And here is the step out:


When I first got the Surface, I installed Painter 2015 and loaded the scan of a bookmark I'd done a couple of years ago, enlarged it, traced over the loopdy parts, then started to tangle. After four nights work, this was the result:

And the progression images:

If you've ever considered buying a tablet, there's a page on Fignations with tips and tricks for drawing on a pressure-sensitive tablet along with some drawing programs to look at along with their cost.

Enjoy and please visit Fignations to see the pattern library and then let me know what you think!

Friday, August 15, 2014

Learn to Crochet Extended Tall Stitches

Yesterday, a video on tall stitches was posted on Moogly, Learn to Crochet Tall Stitches, which showed how to make stitches beyond the Triple Treble - Quadruple Treble, Quintuple Treble, Sextuple Treble, Septuple Treble, Octuple Treble, and Nonuple Treble.

This is a great resource but did you know that there are extended versions of each of these stitches?

These extended versions are slightly taller than the non-extended versions but shorter than the next longer stitch. They are made by starting the same way as the normal stitch, pull through, yo, then pull through only one loop on the hook, yo, then continue making the stitch as usual. This is also true for single crochet and half double crochet.

Below are examples of each stitch and followed by instructions on how to make each extended stitch. If you discard the part of each instruction in italics, you'll be making the "normal" stitch. Check out the Moogly page for a video on making the normal stitches.


(click on image for a larger version)

Extended Stitch Instructions:

  • Extended Single Crochet (esc) - Insert hk into st, yo, pull through, yo, pull through one lp on hk, yo, pull through both lps on hk.
  • Extended Half Double Crochet (ehdc) - Yo, insert hk into st, yo, pull through, yo, pull through one lp on hk, yo, pull through all three lps on hk.
  • Extended Double Crochet (edc) - Yo, insert hk into st, yo, pull through, yo, pull through one lp on hk, (yo, pull through both lps on hk) 2x.
  • Extended Triple/Treble Crochet (etrc or etr) - Yo 2x, insert hk into st, yo, pull through, yo, pull through one lp on hk, (yo, pull through two lps on hk) 3x.
  • Extended Double Treble (edtr or eDtr) - Yo 3x, insert hk into st, yo, pull through, yo, pull through one lp on hk, (yo, pull through two lps on hk) 4x.
  • Extended Triple Treble (eTrtr) - Yo 4x, insert hk into st, yo, pull through, yo, pull through one lp on hk, (yo, pull through two lps on hk) 5x.
  • Extended Quadruple Treble (eQuadTr) - Yo 5x, insert hk into st, yo, pull through, yo, pull through one lp on hk, (yo, pull through two lps on hk) 6x.
  • Extended Quintuple Treble (eQuinTr) - Yo 6x, insert hk into st, yo, pull through, yo, pull through one lp on hk, (yo, pull through two lps on hk) 7x.
  • Extended Sextuple Treble (eSextTr) - Yo 7x, insert hk into st, yo, pull through, yo, pull through one lp on hk, (yo, pull through two lps on hk) 8x.
  • Extended Septuple Treble (eSeptTr) - Yo 8x, insert hk into st, yo, pull through, yo, pull through one lp on hk, (yo, pull through two lps on hk) 9x.
  • Extended Octuple Treble (eOctTr) - Yo 9x, insert hk into st, yo, pull through, yo, pull through one lp on hk, (yo, pull through two lps on hk) 10x.
  • Extended Nonuple Treble (eNonTr) - Yo 10x, insert hk into st, yo, pull through, yo, pull through one lp on hk, (yo, pull through two lps on hk) 11x.

And, of course, you can make even longer stitches if you just yarn over one more time ...

Wednesday, December 18, 2013

Crochet Uncut Fall/Winter 2013 Issue Released

I've spent the last week taking photos of the projects, finishing up the patterns and symbol charts, converting to PDFs, and adding project pages on Ravelry for the Fall/Winter 2013 issue of Crochet Uncut. The last two evenings after work have seen the most activity as I finished up but I think the effort was worth it and finally got it published a little while ago.

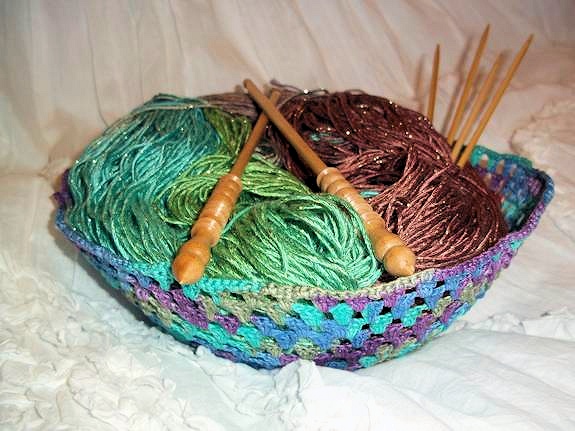
This issue includes five patterns, 10 book reviews, a yarn review of Blue Heron Yarns Rayon Metallic yarn (I adore this yarn!), and a review of Amazing fa-Brick Textile & Fabric Hardener. In addition, the Just-a-Bowl pattern includes a photo tutorial on using the Amazing fa-Brick product to turn the granny doily (or any other doily) into a bowl.

My favorite pattern, and one that took the majority of my time to make, is the Grandma Spiked My Ripple Blanket that takes a granny ripple blanket and adds a spike stitch to it. This makes a very dense pattern that is extremely warm because the usual spaces in a granny stitch are closed up with the spike stitch.

Grandma Spiked My Ripple Blanket

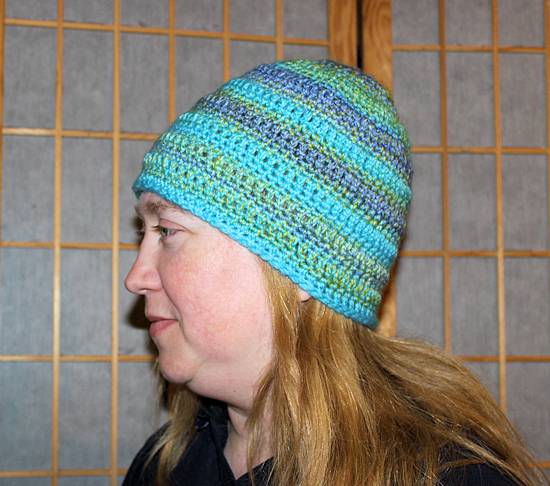
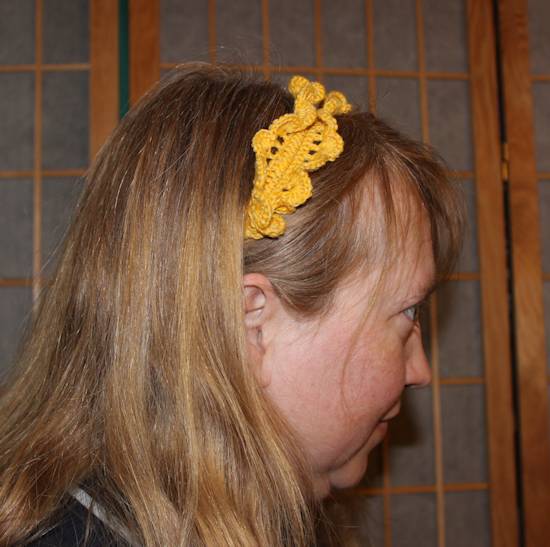
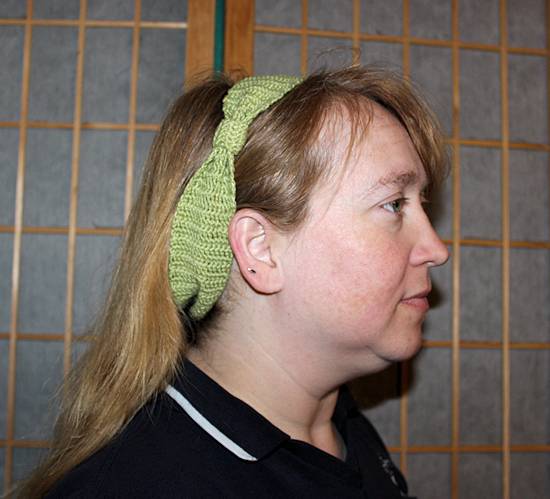
The remaining patterns are a striped beanie (I've already made a total of five of these), a headband crocheted around an elastic hairband, and a headband made to look like a bow.

Let There Be Stripes Beanie

Sunny Headband

Tied in Bows Headband

Just-a-Bowl

And here are the direct links to the patterns:
As usual, all patterns can be downloaded as PDFs and have links to their Ravelry pattern page. In addition, two of them contain symbol charts which can be downloaded separately. They've also been added (or soon will be) to the Pinterest board, Google+ group, and Facebook fan page.

Links to our Facebook fan page, Google+ page, Twitter, and Pinterest board can always be found on the left menu on Crochet Uncut.

Enjoy the patterns and reviews!

Wednesday, November 27, 2013

Tangled Christmas 2013 Greeting Card

Recently, I did a Christmas tree tangle for a greeting card contest but I didn't win but I like it very much so I've added it to my Zazzle store as a greeting card. The inside of the card is blank so you can put whatever message you like there.


And here is the actual image scan for the tangle:

Thursday, September 26, 2013

Bookmark, Wedding, and Botanical Tangles

As usual, I've been quite remiss in updating this blog so I'll try to catch up. You can click on the images to see larger versions, especially for the last one.

I did several additional tangled bookmarks which you'll see below. Each one is 2"x6" and took up to 2 hours to complete. They don't have any shading on them as the bookmark pieces had a smooth finish that did not accept pencil shading very well. They can be used as bookmarks or mounted in a frame as art. Any of them are for sale for $10 each, which includes shipping and handling.


Materials: Sakure Micron Pens, pencil on purchased bookmark
Time Spent: 1-2 hours
Size: 2"x6"

I also asked some online friends for wedding photos that I could convert to doodles. I eventually want to sell these on etsy as special orders based on photos the customer sends me.

The doodle below is the first one I completed. The original photo showed the couple staring off to see on the deck of a cruise ship. I added the railing and tried to use patterns that imitated where it was, i.e., flowing ones for the dress, wavy ones for the water, etc. The photo didn't really show the bride's bouquet (only found the tip of one flower in the photo) so I added it based on a second photo the bride sent me.


Materials: Sakure Micron Pens, pencil on Bristol paper
Time Spent: 6 hours
Size: 5"x8"

The second one I did was of a bride and groom holding hands to show off their rings. I did have someone say that the feather at the far left made it look like the hand was missing fingers so I tried to darken the outlines around the hands. I used a new pen I'd just purchased and it bled so I may have ruined it. I haven't gotten up the courage to scan that version in yet so you'll just have to take this one.


Materials: Sakura Micron Pens, pencil on Bristol paper
Time Spent: 7 hours
Size: 8"x5"

The final tangle I'm going to show you is one I did was to celebrate the 25th anniversary of the American Botanical Council and their 100th issue (30th anniversary) of their print journal, HerbalGram. I actually work for a small advertising firm that handles the ad sales for ABC and my boss paid for the frame while I did the drawing and mounting. I went through back issues of HerbalGram and picked out different plants that had been featured over the years. On August 23rd, we went to the ABC office and presented it to Mark Blumenthal, the founder of ABC. They seemed really pleased with it and placed it on temporary display in the front office on a small easel until they could find a permanent display location on a wall.

Top row, left to right: Ginseng, Olives, Gingko, Garlic, Camu Camu
Center: Echinacea
Bottom row, left to right: Termitomyces robustus, Sage, St. John’s Wort, Aloe Vera, Prickly Pear

Materials: Sakura Micron pens, pencils on Bristol paper
Time Spent: 15 hours
Size: 9"x12"

Anyway, hope you enjoy seeing my work. I've not been able to do any lately as I've been busy with other things but hopefully I can do a few more soon.


Friday, September 06, 2013

Egg Cups with Heavy Cream and Shredded Cheese

I originally found this recipe on the Somersize boards at SuzanneSomers.com but the board is no longer used (although it is archived) and not the easiest to search through.

I believe this is a Level One recipe and it is so good you'll definitely want to make it as often as possible.

One thing I will say is that you probably shouldn't cook these in a toaster oven. The top browns too fast and the egg yolk doesn't have enough time to fully cook. I'm saying this because the photo below is of an egg cup that was cooked in a toaster oven (my sister's doing) and I ended up peeling off the browned part - although Basha, the resident husky, was ecstatic about them.

I actually like to make these the night before, sans the heavy cream, cover them and place in the fridge overnight. The next morning, I take them out, pour on the cream, and bake.

Egg Cups with Heavy Cream and Shredded Cheese - Pro/Fat, Level One


Ingredients (per cup):

1 egg
2 tbl grated cheese (approximate)
1-2 tbl heavy cream
Salt and pepper to taste
Butter, enough to cover sides and bottom of ramkin
(optional) Few pieces of cooked chicken, turkey, ham, or sausage

You'll also need:

Small ramkin for each egg cup
Cookie sheet
Aluminum foil

Preparation:

Preheat oven to 300 degF.

Place aluminum foil on a baking sheet as it is very likely that the goodness will overflow.

Cover sides and bottom of a small ramkin with the butter.

Crack an egg into the ramkin, poke yolk with a fork and slightly swirl it. Don't mix it into the whites too much as you still want a definite cooked yolk for this.

Sprinkle with salt and pepper to taste.

(Optional) Sprinkle a few pieces of your favorite meat on top of the egg making sure there will be enough to have a small piece in each bite.

Cover egg/meat with grated cheese almost to top of ramkin.

Slowly pour heavy cream over cheese until the nooks and crannies are filled. Don't let the cream go all the way to the top of the ramkin.

Place ramkin on tinfoil covered cookie sheet and bake for 25-30 minutes. If you only cook it for 15-20 minutes, they yolk may not be completely cooked through.

Remove from oven and let cool slightly. Ramkins and contents will be extremely hot.

Serve with your favorite breakfast or brunch sides.

P.S. One time when I couldn't locate my ramkins (we were in the process of moving), I used a small glass baking dish and about seven eggs to make a type of casserole.

Wednesday, August 14, 2013

First Tangled Bookmark

I've been working on a special tangle that is 9"x12" but can't show it yet as I don't want anyone who might be associated with the group it is for to see it. I'll show it as soon as I can though.

In the meantime, I've been crocheting an African Flower elephant from a pattern by Heidi Bears on Ravelry. The Bubbo's Pants group is having a CAL for any of her animals (hippo, pony, giraffe, elephant, frog, or bear) and one of the ladies purchased the elephant pattern for me since I couldn't afford it. Not that the prices are high, they aren't, but with only a part time job right now, it just wasn't in my budget. So far, I've almost completed her bum. It's going slowly since I was jumping between her and the tangle all weekend. It will probably have to go on the back burner for a while as I really must get going on designs for the next issue of Crochet Uncut.

Last night, I decided to tangle a bookmark. I'd purchased a pack of them at Michaels for 99 cents and wanted to try them out. They aren't made for tangling and have a glossy finish so the ink dries much slower than on Bristol board - but I like how it came out. You can see it below. It is 2"x6", took just over 2 hours to complete, and, if you'd like to purchase it, is $10 which includes shipping and handling.


By the way, I just wanted to mention again that even though I'm calling these tangles, that is just so other people recognize what they are and can find them. I do not Zentangle®. I am not a Certified Zentangle Teacher (CZT) nor do I ever plan to be. Zentangling incorporates specific methods of doodling and also incorporates some teachings that I cannot support. If I ever teach how to tangle, it will not be following their methods.

I just wanted to make that clear.

The Zentangle® Method was created by Rick Roberts and Maria Thomas and is copyrighted. Zentangle® is a registered trademark of Zentangle, Inc. Learn more at zentangle.com.

Thursday, August 08, 2013

Tangled ShrinkyDink - First Try

I've working on the best technique and materials for making stitch markers with ShrinkyDink and tangles. I really need to get some alcohol-based pens as the microns smear too much although they do bake permanent. Since the ink wasn't permanent and smeared, I added the color on the back. After baking, I found that the bottom-or maybe it was the inside center-pushed out around the edges so I'll need to take that into consideration as I continue. Also, even though I used a normal hole punch size of 1/8", the hole was way too tiny after shrinking so I'll need to either use a bigger hole punch or use a drill to make the hole larger after shrinking.

Also, the instructions for ShrinkyDinks said to place the piece on a piece of brown paper bag, then after taking it out of the oven to press it with a pad or folded paper. When we did this, the brown paper bag got stuck onto the back of the piece and had to be softened with water and scraped off. I still haven't gotten all of it off though.

One thing that made it easier was that I purchased a Fiskars Round 'n Round X-Large Easy Squeeze Punch which punches out a 2" round circle which shrinks down to about the size of a nickle. It was about $18 at Michaels but I had a 40% off one item at original price coupon so the price was more in my price range.

Anyway, here's the finished test product that I placed on the scanner since my camera has gone awol. Pressing it with the pad also meant it lost any shine it may have had so maybe I'll have to add some protection to it to get it shiny again.


Wednesday, August 07, 2013

Tangle Pattern: Cactus

My sister Jessica uses my computer during the day while I'm at work since it is more powerful than her computer is. I usually have the cards that I make the tangle pattern thumbnails on lying on my desk so, one day she drew a pattern for me on one of them. She said it was based on a cactus but made using hearts and that she'd been drawing it for years. I finally figured out the steps tonight and put them together.

Oh, and here's the links to the pin for this on Pinterest and to the image on Flickr.

(Click on image for larger version)

Also, I've been pinning the tangle patterns I find on Pinterest but have been redrawing them so I have uniform thumbnails. You can find my Tangle Pattern board here.


Saturday, July 06, 2013

Two Dog Tangle

When I was packing to move from Utah to Texas, I'd placed some yarn and other items on my bed to get them out of the way. My dogs, Mr. Darcy and Linus, loved to play on my bed and as a result, I ended up with what I called "The Two Dog Tangle." I posted in a forum on Ravelry where they loved to untangle stuff and a lady in California offered to untangle my mess.

It started out as not being such a big thing after a few "Get off the bed!" hollers at them:


After a few more play sessions, it looked something like this after I was able to remove a few items but what remained filled almost half of a 13 gallon garbage bag. There were at least 5 projects in there, one that I removed the needles from as I couldn't remember what I was making. You can see two of them at the top of the photo, one at the far left, one at the bottom left, and the last one is somewhere in there. The motif one is the only one I needed saved. The ear buds for the iPod are also still in there (see lower right corner for small section of cord). Some of the yarn had fallen through the headboard (through different sections) and was tangled under the bed. One skein had been located by the Shih Tzu (Linus) under the bed and dragged out into the hall before I could catch him.


Items successfully removed from yarn barf: 1 C-Pap machine with tubing and cord, 2 iPod cords, 2 skeins of Hobby Lobby fuzzy yarn, 1 partial skein of Lion Brand Jiffy Yarn, 1 ball of metallic Feza, a small amount of pink yarn, 1 skein of misc. green yarn (possibly also Hobby Lobby, cotton), and some fabric scraps.


With packing and driving from Utah to Texas, I just couldn't handle untangling the rest myself so the untangling group on Ravelry was a life saver. Anyway, it's been far too long since I received the untangled yarn and I really needed to take the time to make something to send back to the lady who untangled it as a thank you. I'd already decided to send her one of my crocheted angel ornaments but since I'd recently started tangling in earnest, I thought it would be a good idea to make one for her. I also called it "Two Dog Tangle" after the reason it was made.


I want to add a few more items to the package before I send it but the angel and this tangle will be the main items in it.

Fortunately, most of my yarn is in storage so there's not much for my dogs to get into now, although they do find the odd skein lying around if I'm not careful.