Thursday, September 26, 2013

Bookmark, Wedding, and Botanical Tangles

As usual, I've been quite remiss in updating this blog so I'll try to catch up. You can click on the images to see larger versions, especially for the last one.

I did several additional tangled bookmarks which you'll see below. Each one is 2"x6" and took up to 2 hours to complete. They don't have any shading on them as the bookmark pieces had a smooth finish that did not accept pencil shading very well. They can be used as bookmarks or mounted in a frame as art. Any of them are for sale for $10 each, which includes shipping and handling.


Materials: Sakure Micron Pens, pencil on purchased bookmark
Time Spent: 1-2 hours
Size: 2"x6"

I also asked some online friends for wedding photos that I could convert to doodles. I eventually want to sell these on etsy as special orders based on photos the customer sends me.

The doodle below is the first one I completed. The original photo showed the couple staring off to see on the deck of a cruise ship. I added the railing and tried to use patterns that imitated where it was, i.e., flowing ones for the dress, wavy ones for the water, etc. The photo didn't really show the bride's bouquet (only found the tip of one flower in the photo) so I added it based on a second photo the bride sent me.


Materials: Sakure Micron Pens, pencil on Bristol paper
Time Spent: 6 hours
Size: 5"x8"

The second one I did was of a bride and groom holding hands to show off their rings. I did have someone say that the feather at the far left made it look like the hand was missing fingers so I tried to darken the outlines around the hands. I used a new pen I'd just purchased and it bled so I may have ruined it. I haven't gotten up the courage to scan that version in yet so you'll just have to take this one.


Materials: Sakura Micron Pens, pencil on Bristol paper
Time Spent: 7 hours
Size: 8"x5"

The final tangle I'm going to show you is one I did was to celebrate the 25th anniversary of the American Botanical Council and their 100th issue (30th anniversary) of their print journal, HerbalGram. I actually work for a small advertising firm that handles the ad sales for ABC and my boss paid for the frame while I did the drawing and mounting. I went through back issues of HerbalGram and picked out different plants that had been featured over the years. On August 23rd, we went to the ABC office and presented it to Mark Blumenthal, the founder of ABC. They seemed really pleased with it and placed it on temporary display in the front office on a small easel until they could find a permanent display location on a wall.

Top row, left to right: Ginseng, Olives, Gingko, Garlic, Camu Camu
Center: Echinacea
Bottom row, left to right: Termitomyces robustus, Sage, St. John’s Wort, Aloe Vera, Prickly Pear

Materials: Sakura Micron pens, pencils on Bristol paper
Time Spent: 15 hours
Size: 9"x12"

Anyway, hope you enjoy seeing my work. I've not been able to do any lately as I've been busy with other things but hopefully I can do a few more soon.


Friday, September 06, 2013

Egg Cups with Heavy Cream and Shredded Cheese

I originally found this recipe on the Somersize boards at SuzanneSomers.com but the board is no longer used (although it is archived) and not the easiest to search through.

I believe this is a Level One recipe and it is so good you'll definitely want to make it as often as possible.

One thing I will say is that you probably shouldn't cook these in a toaster oven. The top browns too fast and the egg yolk doesn't have enough time to fully cook. I'm saying this because the photo below is of an egg cup that was cooked in a toaster oven (my sister's doing) and I ended up peeling off the browned part - although Basha, the resident husky, was ecstatic about them.

I actually like to make these the night before, sans the heavy cream, cover them and place in the fridge overnight. The next morning, I take them out, pour on the cream, and bake.

Egg Cups with Heavy Cream and Shredded Cheese - Pro/Fat, Level One


Ingredients (per cup):

1 egg
2 tbl grated cheese (approximate)
1-2 tbl heavy cream
Salt and pepper to taste
Butter, enough to cover sides and bottom of ramkin
(optional) Few pieces of cooked chicken, turkey, ham, or sausage

You'll also need:

Small ramkin for each egg cup
Cookie sheet
Aluminum foil

Preparation:

Preheat oven to 300 degF.

Place aluminum foil on a baking sheet as it is very likely that the goodness will overflow.

Cover sides and bottom of a small ramkin with the butter.

Crack an egg into the ramkin, poke yolk with a fork and slightly swirl it. Don't mix it into the whites too much as you still want a definite cooked yolk for this.

Sprinkle with salt and pepper to taste.

(Optional) Sprinkle a few pieces of your favorite meat on top of the egg making sure there will be enough to have a small piece in each bite.

Cover egg/meat with grated cheese almost to top of ramkin.

Slowly pour heavy cream over cheese until the nooks and crannies are filled. Don't let the cream go all the way to the top of the ramkin.

Place ramkin on tinfoil covered cookie sheet and bake for 25-30 minutes. If you only cook it for 15-20 minutes, they yolk may not be completely cooked through.

Remove from oven and let cool slightly. Ramkins and contents will be extremely hot.

Serve with your favorite breakfast or brunch sides.

P.S. One time when I couldn't locate my ramkins (we were in the process of moving), I used a small glass baking dish and about seven eggs to make a type of casserole.

Wednesday, August 14, 2013

First Tangled Bookmark

I've been working on a special tangle that is 9"x12" but can't show it yet as I don't want anyone who might be associated with the group it is for to see it. I'll show it as soon as I can though.

In the meantime, I've been crocheting an African Flower elephant from a pattern by Heidi Bears on Ravelry. The Bubbo's Pants group is having a CAL for any of her animals (hippo, pony, giraffe, elephant, frog, or bear) and one of the ladies purchased the elephant pattern for me since I couldn't afford it. Not that the prices are high, they aren't, but with only a part time job right now, it just wasn't in my budget. So far, I've almost completed her bum. It's going slowly since I was jumping between her and the tangle all weekend. It will probably have to go on the back burner for a while as I really must get going on designs for the next issue of Crochet Uncut.

Last night, I decided to tangle a bookmark. I'd purchased a pack of them at Michaels for 99 cents and wanted to try them out. They aren't made for tangling and have a glossy finish so the ink dries much slower than on Bristol board - but I like how it came out. You can see it below. It is 2"x6", took just over 2 hours to complete, and, if you'd like to purchase it, is $10 which includes shipping and handling.


By the way, I just wanted to mention again that even though I'm calling these tangles, that is just so other people recognize what they are and can find them. I do not Zentangle®. I am not a Certified Zentangle Teacher (CZT) nor do I ever plan to be. Zentangling incorporates specific methods of doodling and also incorporates some teachings that I cannot support. If I ever teach how to tangle, it will not be following their methods.

I just wanted to make that clear.

The Zentangle® Method was created by Rick Roberts and Maria Thomas and is copyrighted. Zentangle® is a registered trademark of Zentangle, Inc. Learn more at zentangle.com.

Thursday, August 08, 2013

Tangled ShrinkyDink - First Try

I've working on the best technique and materials for making stitch markers with ShrinkyDink and tangles. I really need to get some alcohol-based pens as the microns smear too much although they do bake permanent. Since the ink wasn't permanent and smeared, I added the color on the back. After baking, I found that the bottom-or maybe it was the inside center-pushed out around the edges so I'll need to take that into consideration as I continue. Also, even though I used a normal hole punch size of 1/8", the hole was way too tiny after shrinking so I'll need to either use a bigger hole punch or use a drill to make the hole larger after shrinking.

Also, the instructions for ShrinkyDinks said to place the piece on a piece of brown paper bag, then after taking it out of the oven to press it with a pad or folded paper. When we did this, the brown paper bag got stuck onto the back of the piece and had to be softened with water and scraped off. I still haven't gotten all of it off though.

One thing that made it easier was that I purchased a Fiskars Round 'n Round X-Large Easy Squeeze Punch which punches out a 2" round circle which shrinks down to about the size of a nickle. It was about $18 at Michaels but I had a 40% off one item at original price coupon so the price was more in my price range.

Anyway, here's the finished test product that I placed on the scanner since my camera has gone awol. Pressing it with the pad also meant it lost any shine it may have had so maybe I'll have to add some protection to it to get it shiny again.


Wednesday, August 07, 2013

Tangle Pattern: Cactus

My sister Jessica uses my computer during the day while I'm at work since it is more powerful than her computer is. I usually have the cards that I make the tangle pattern thumbnails on lying on my desk so, one day she drew a pattern for me on one of them. She said it was based on a cactus but made using hearts and that she'd been drawing it for years. I finally figured out the steps tonight and put them together.

Oh, and here's the links to the pin for this on Pinterest and to the image on Flickr.

(Click on image for larger version)

Also, I've been pinning the tangle patterns I find on Pinterest but have been redrawing them so I have uniform thumbnails. You can find my Tangle Pattern board here.


Saturday, July 06, 2013

Two Dog Tangle

When I was packing to move from Utah to Texas, I'd placed some yarn and other items on my bed to get them out of the way. My dogs, Mr. Darcy and Linus, loved to play on my bed and as a result, I ended up with what I called "The Two Dog Tangle." I posted in a forum on Ravelry where they loved to untangle stuff and a lady in California offered to untangle my mess.

It started out as not being such a big thing after a few "Get off the bed!" hollers at them:


After a few more play sessions, it looked something like this after I was able to remove a few items but what remained filled almost half of a 13 gallon garbage bag. There were at least 5 projects in there, one that I removed the needles from as I couldn't remember what I was making. You can see two of them at the top of the photo, one at the far left, one at the bottom left, and the last one is somewhere in there. The motif one is the only one I needed saved. The ear buds for the iPod are also still in there (see lower right corner for small section of cord). Some of the yarn had fallen through the headboard (through different sections) and was tangled under the bed. One skein had been located by the Shih Tzu (Linus) under the bed and dragged out into the hall before I could catch him.


Items successfully removed from yarn barf: 1 C-Pap machine with tubing and cord, 2 iPod cords, 2 skeins of Hobby Lobby fuzzy yarn, 1 partial skein of Lion Brand Jiffy Yarn, 1 ball of metallic Feza, a small amount of pink yarn, 1 skein of misc. green yarn (possibly also Hobby Lobby, cotton), and some fabric scraps.


With packing and driving from Utah to Texas, I just couldn't handle untangling the rest myself so the untangling group on Ravelry was a life saver. Anyway, it's been far too long since I received the untangled yarn and I really needed to take the time to make something to send back to the lady who untangled it as a thank you. I'd already decided to send her one of my crocheted angel ornaments but since I'd recently started tangling in earnest, I thought it would be a good idea to make one for her. I also called it "Two Dog Tangle" after the reason it was made.


I want to add a few more items to the package before I send it but the angel and this tangle will be the main items in it.

Fortunately, most of my yarn is in storage so there's not much for my dogs to get into now, although they do find the odd skein lying around if I'm not careful.

Friday, July 05, 2013

Steampunk Tangles

I decided I needed to practice adding color to some tangles. I didn't do too well but it wasn't bad for a first attempt.

Here's the tangle before I added color to it:


And after adding color to it:


I'll just have to keep practicing.

Wednesday, June 19, 2013

Tangled Initial "H"

Finished this one about 2am this morning. Once I got started I just couldn't stop until it was done. I added a crochet hook and ball of yarn to this one.


Size: 3.5"x3.5"
Time: 4 hours
Materials: Micron on Bristol

There are hundreds of patterns out there and the two main sites I found have links to many of them, but neither one of them are complete. Just wish I had the time to find them all and put together my own link pages.

Friday, June 14, 2013

Tangle Weaving

An online friend recently mentioned that her son was into Zentangles so I looked it up. Basically, it's structured doodling. Of course, I've been doodling most of my life and I have the meeting notes to prove it! So, I decided to just do my normal doodles, then add some of the tangle patterns I found just to finish it off. After four hours, this is the result:


Size: 5.5"x8.5"

The next night, I purchased some Bristol paper and cut them into 3.5"x3.5" cards and made my first initial, including a paint palette and brushes:


Size: 3.5"x3.5"
While looking up patterns, I also found some designated as "line weaving" which I prefer over ZenTangle since I don't really like to use defined spaces that often when I'm doodling. In a post on Facebook, I put it as Zentangle/Line Weaving so my mother suggested I call this "Tangle Weaving." I like the sound of that.

I'm currently trying to figure out some sort of organization method so that I have a snapshot of as many patterns as I can get hold of, without having to print them all out. I may have come up with something but not sure if it will work out yet.

In the meantime, if you want to learn more about this, you can do a search on "Zentangles" on Google and Pinterest to find tons of images and patterns. The term "Zentangle" is a registered trademark, but "tangle" and "line weaving" are not. You're also free to use "Tangle Weaving" if that's what you prefer to use, no restrictions.

Resources:

Tuesday, June 04, 2013

Crochet Uncut Summer 2013 Issue Released

I admit, it took a long time to get this issue out. Not long after I released the last issue, I lost my job and moved from Utah back to Texas, Austin to be exact. I've spent most of the time looking for work, working contract jobs (some of which required anywhere from one to two hour commutes - one way), and trying to find the time to come up with designs, make them, and do reviews. I finally found some part time work, which still requires a one hour commute. Unfortunately, the job is not technical writing but it's a job, I enjoy it, and it pays the few bills I have left.

Anyway, the Summer issue is finally finished and released and includes reviews of some of Windy Valley Muskox yarns and some of the Crochet Dude's crochet supplies. You'll also find a tutorial on figuring out how to use the Crocodile Stitch to make an edging for a pillow. I had to figure out the edging for the ring bearer pillow for my nephew Cody's wedding.

Crocodile Stitch Pillow Edging
The patterns in this issue are a Windy Prairie Scarf made using one of the Windy Valley yarns and a Crocodile Stitch Kerchief. Both patterns are easily adapted to make them larger or smaller. The scarf can be worn in a variety of ways and I've included several photos to show them off.

Windy Prairie Scarf
Crocodile Kerchief
And here are the direct links to the patterns:


As usual, all patterns can be downloaded as PDFs and have links to their Ravelry pattern page. In addition, they all contain symbol charts which can be downloaded separately. They've also been added to the Pinterest board, Google+ group, and Facebook fan page.

Links to our Facebook fan page, Google+ page, Twitter, and Pinterest board can always be found on the left menu on Crochet Uncut.

Enjoy the patterns and reviews!

Thursday, November 01, 2012

Chicken Enchiladas with Green Chili and Greek Yogurt Sauce and Somewhat Salsa

So, I'd promised my sister Jenny that I would make some Chicken Enchiladas. I had a few recipes pinned on my food board on Pinterest but didn't really have exactly the ingredients I needed for any of them so I decided to improvise. I took two of the recipes that had some of the basic ingredients I had and then I went at it. Next time I make this, I'll add more chicken broth and yogurt but only so the enchiladas are more fully covered (recipe below adds more to take care of this) but the tortilla ends that got a bit crispy where really good too. We didn't have any hot peppers so my sister took a dried hot Asian pepper we had for making Spicy Chicken with Cashews (see link below), removed the seeds, placed it in a saucepan with about 3 tbl water and boiled it. Once it was boiled down to about 2 tbl, she strained out the pepper. I used about 3 tsp in the sauce instead of the fresh hot pepper. My brother-in-law also dribbled a little of it on top of his enchiladas and ended up with what he called a "nice burn in the mouth and my forehead is breaking out in a sweat, which is good." To finish it off, we made some homemade salsa to put on top of the enchiladas before eating.


  • Spicy Chicken with Cashews on Pinterest - I make this about 3 times a month with the modifications notesd in the pin


  • My Pinterest Food Board


  • Somewhat Salsa

    A light salsa-like topping for the enchiladas.

    Ingredients:
    3 roma tomatoes, chopped with seeds removed
    3 fresh basil leaves, finely chopped
    2 garlic cloves, minced or jarred equivalent
    1 tbl dried cilantro (or some fresh if you have it)
    1 small lemon or lime
    2 tbl onion, chopped
    salt and pepper to taste
    (optional) a diced jalepeno or serrano pepper

    Preparation:

    Mix together all ingredients except lemon/lime. Cut lemon/lime in half and squeeze over mixture making sure to remove any seeds that fall in. Mix well, cover, and place in fridge. Makes about 1 cup and a bit.


    Chicken Enchiladas with Green Chili and Greek Yogurt Sauce

    Chicken, onions, and cheese wrapped in wheat tortillas and covered in a green chili and yogurt sauce, then topped with more cheese and baked to a bubbly perfection. My brother-in-law said it tasted like something you'd get at Z'Tejas here in Austin. He ate three of them.

    Makes 14-16 enchiladas

    Ingredients:

    Sauce:
    1 tbl unsalted butter
    1 Serrano pepper or other hot pepper, minced (remove seeds for a milder sauce)
    2 garlic cloves, minced or jarred equivalent
    1 tbl flour
    1 1/4 cup low sodium or salt-free chicken broth
    1 tsp cumin
    1/4 tsp chipolte chili powder (optional)
    1/4 tsp salt
    1/4 tsp pepper
    1 4-oz can chopped green chilis
    1 tbl dried cilantro
    3/4 cup Chiabani low-fat Greek yogurt, plain (can use sour cream instead)

    Enchiladas:
    3 cups shredded, cooked chicken breasts (about 4 large breasts)
    8 oz shredded cheese, your choice (Monterrey Jack, Mexican mix, Colby Jack, etc.)
    1 small onion, chopped fine
    14-16 small wheat tortillas

    You'll also need a large baking dish or two smaller ones, enough to hold at least 14 enchiladas, 16 if you use less meat in each one.

    Preparation:

    Preheat oven to 375F.

    In a saucepan, melt butter over medium-high heat, add garlic and pepper. Saute for 1 minute. Add flour and whisk quickly, cook for 2 minutes then add in chicken broth, cumin, salt, and pepper, continuing to whisk sauce as each is added. Bring to a boil then whisk in the yogurt, green chilies, and cilantro. Remove from heat.

    Spray the baking dish(es) with olive oil or vegetable oil spray. Spoon some of the sauce into the dish, enough to lightly cover the bottom. Place a tortilla on a plate, add chicken, onion, and shredded cheese into the center of the tortilla and roll the sides over. Pick up the roll and hold over the baking dish, quickly turning it so the seam is on the bottom and place in the dish. Repeat for remaining tortillas. We were able to get 14 enchiladas made before we ran out of room and we really stuffed the rolls too. If needed, push the rolls together to get more room. You may also be able to place some against the side. Pour the remaining sauce over the enchiladas, covering them as much as possible. Top with remaining cheese.


    Place in oven (if dishes aren't deep ones, place on cookie sheets in the oven, just in case) and bake for 15-20 minutes or until cheese is golden.


    Serve immediately with some of the salsa sprinkled over each enchilada, and if wanted, add little more Greek yogurt on the side. A nice salad and some sweet corn would make great side dishes.


    I'd love to hear what you think of this recipe and any modifications you make to it. I'm thinking a yogurt sauce (or sour cream sauce) mixed in with the chicken would be an awesome addition!

    Thursday, October 04, 2012

    New Zazzle Items - A Warning and Three Dolphins

    I've added a couple of new products to my Zazzle store. The first is perfect for those days when you only have one nerve left and the second is for any dolphin lover.

    The warning started out in a thread on Ravelry.com and I loved the phrase so much that I re-worded it and put a sign together. The original poster loved it! You can get the warning on a poster, mouse pad, t-shirt, mug, electronics case (laptop, Kindle, iPad, etc.)


    The dolphins poster is currently available on a 6"x9" poster, mouse pad, greeting/note card, and postcard. I've also submitted it for a postage stamp but have to wait for it to be approved. I'm currently rendering the image at 20"x16" for a larger poster but based on the current render rate (5% per 24 hours), it won't be ready for another 18 days, minimum.

    I originally made this years ago for a co-worker who was adopting two sisters and one of them loved dolphins. She was having a rough time and my co-worker asked if I could make her a dolphin image and this is the result. I didn't want to use the original image since it was just for her so I widened it so more of the scenery was visible. I think it kind of looks like one of those underwater scenes you find on puzzles.


    Since these won't show up for about 24 hours:
    Oh, side note, for some reason, the right side bar items have been pushed down to below the posts and I can't figure out why yet. I've posted a help request in the user forums and hopefully it will be fixed soon.

    Tuesday, September 04, 2012

    Cute ruffled skirts & a bracelet/earring set

    Somehow (as usual) I forgot to add pictures of the ruffled skirts I made. I can make them in Child sizes 3-6 and Girls sizes 7-14. The Child sizes are $25 plus S&H while the Girls sizes are $30 plus S&H. I have skirts for sizes 4, 5, 6, and 14 already made with a special order available for all sizes. For the special order, you can even let me know the colors to use. Check out the Clothing category on my Artfire shop to purchase one of the skirts or order one. All skirts will be made of 100% cotton with nylon zippers.

    And now the pictures:

    Child size 4

    Child size 5

    Child size 6

    Girls size 14

    Cute, eh?

    I also made a bracelet and matching earrings using Chalcedony nuggets, Agate beads, Swarovski crystals, and silver plated findings. The bracelet is $75 and the earrings are $25.


    Sunday, April 29, 2012

    Crochet Uncut Spring 2012 Issue Published

    I realized today that I forgot to post here that I'd released the Spring 2012 issue of Crochet Uncut. I posted on Facebook, Ravelry, and Google+, added the photos to Pinterest as well, but forgot to post it here.

    Anyway, the issue contains two patterns and a tutorial, again all my designs. All three have symbol crochet charts made using the Crochet Charts software made by Stitch Works Software. If you design crochet, this is an invaluable tool. It really helped me with the design for the Tangleweb Afghan. I did a review of this software in a previous issue of Crochet Uncut and some additional updates have been made since then with more in the works.

    The tutorial is for a six pointed star that you join as you go. Make a few of them for a pillow or add more for a wrap or afghan. Use different yarns to get a light wrap or heavier yarn for larger stars.

    Star Light Star Bright Tutorial

    The first pattern can be made into an afghan, wrap, or scarf. Instructions are provided to make just the size you need. I've already started projects for a baby blanket and a curtain for the back door to keep out the flies while allowing Mr. Darcy to spend time outside without us having to keep an eye on him. I'm also working on a variation to the design for an infinity scarf which I'll probably have up for sale on Ravelry once it's completed.
    Tangleweb Afghan modeled by Mr. Darcy

    The second pattern is for a bright spring purse that can also be easily modified to be larger or smaller or to change the size of the handles. It's a perfect way to use up a few leftover yards of yarn.
    Tincture of Spring Purse

    On a side note, I was offered quite a bit of money to sell Crochet Uncut, enough that I could have paid off my bills and moved back to Texas, but I turned the offer down. I talk about it a bit more in the Letter to the Editor for this issue, but I don't intend to sell the site ... ever!

    Don't forget to check out the reviews and keep an eye out for some yarn reviews that will be added once the yarn arrives.

    And here are the direct links to the patterns:

    Remember, all patterns have a downloadable PDF version available. Just look for the PDF icon next to the Ravelry project page button.


    I'm also continuing work on the Mrs. Claus Washing pattern. It's on the back burner for a bit but I'm hoping to get back to it soon. The free patterns I design and my painting always seem to take priority over patterns I'm planning on selling.

    Oh, and before I forget, please feel free to follow the Pinterest board I created for Crochet Uncut and repin the projects you like. If you have a project you've completed following one of the patterns in Crochet Uncut and would like to have it added to the Pinterest board, send me an IM on Ravelry with a link to the project. Just remember that I can't pin images from Facebook so the image will have to be on located elsewhere in order to be pinned, for example, Ravelry, Flickr, a blog, etc.

    Links to our Facebook fan page, Google+ page, Twitter, and Pinterest board can always be found on the left menu on Crochet Uncut.

    Hope you enjoy the patterns!

    Tuesday, April 10, 2012

    Double-Sided Crochet Tutorial

    So, I thought I'd posted this here but can't find it anywhere and since I really don't have a lot of posts, it should have been easy to find if it were here.

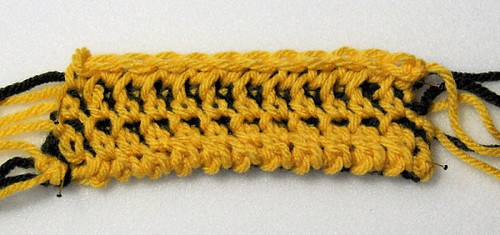
    Anyway, when I lived closer to Sandy, UT, I'd pop into Unraveled Sheep quite often and even taught some crochet classes there. Twice I've been asked to decipher "old family patterns" and one was the diagonal box stitch and the other was a double sided crochet design with old terms that the lady who brought it in couldn't decipher.

    These photos are my results:


    The free tutorial is up on Ravelry if you're interested. It makes for a very thick fabric but if you use a thinner yarn, it won't be quite as thick or warm.

    Thursday, February 02, 2012

    Tatting, more Crochet, and a Dr. Who Scarf started

    It's been a while, but I've been busy so that's my excuse and I'm sticking with it.

    Christmas was very quiet, as usual, with just my sister and the furries. We didn't get a ham this year as we were leaving for Austin three days later and wouldn't be able to finish it in time.

    In Austin, we stayed with sister Jenny and her husband Brian and traveled back and forth to San Antonio to attend the Air Force basic training graduation ceremonies. My oldest nephew Clay was our proud Airman. His mother, Darlene was there with her husband Jimmy (who is in the Army) and their other five boys (one is a foster son).
    Airman Jimmy Clay Smith, Jr.

    And, of course, we had to get a photo of the proud mom and aunts ...

    Jessica, Jenny, Darlene, Darlisa

    We spent a week and a half in Austin (saved $180 in airfare that way) and one evening Jenny was showing us her needle tatting. Years ago I'd purchased a learn needle tatting book but never tried it. I had tried shuttle tatting but it never clicked and the way the shuttle had to be used just seemed weird to me. Last Saturday, Jess said she wanted to learn so I bought a few more needles and some thread. Once we got home, I found the book in my library, figured it out and taught Jess. I taught her to knit a few weeks back so we'll see which one she keeps up with. On Sunday, I started tatting a heart that was a free pattern at Hobby Lobby (and is also online at Handy Hands Tatting) and finished it on Tuesday. The picots are too big and one of the side chains has an extra picot, but not too bad for a first try.

    I've already started a larger project. It's go big or go home for me when it comes to doing stuff!

    My brother-in-law, Brian (Jenny's husband) is a huge Dr. Who fan (well, so is Jenny) and he asked me to make him a Season 16 Scarf. There are several sites with patterns but I settled on the one at the Witty Little Knitter because the yarn selections were all one brand and I could order them online. Another site that is good for patterns is DoctorWhoScarf.com.

    So far I have 190 rows completed but the pic below shows it after about 130 rows or so.


    I used the Scarf-o-matic to calculate how much I have completed and, since it's too long to put here, I've added it to the header of my blog instead.

    In other news, I finished an afghan design that I'm really proud of. I started it before Christmas, worked on it on the plane, in the airport, and while in Austin, then finished it when I got home. The full pattern, with guidelines on making it into a scarf or wrap instead, will be in the next issue of Crochet Uncut.

    Wednesday, December 14, 2011

    New painting - Indian Chief Head Study

    So, last year I asked Jon McNaughton if we could do a head study of a dark skinned person and this is the result. I haven't been able to take classes for the last several months because of finances but had saved up so I could attend this class. I'm really really trying to spend more time painting but it's not easy when you're working full time and sewing items on commission just to make ends meet.

    Anyhow, here is the painting:

    The painting can be purchased in my Artfire shop as well as other locations.